All checks were successful
Publish to Confluence / confluence (push) Successful in 3m39s
272 lines
5.7 KiB
Markdown
272 lines
5.7 KiB
Markdown
<!-- Space: qifu -->
|
||
<!-- Parent: 后端技术&知识&规范 -->
|
||
<!-- Parent: 技术方案 -->
|
||
<!-- Parent: 基建 -->
|
||
<!-- Parent: 03-接入指南 -->
|
||
<!-- Title: 20250107-Yearning安装及SSO接入指南 -->
|
||
|
||
<!-- Macro: :anchor\((.*)\):
|
||
Template: ac:anchor
|
||
Anchor: ${1} -->
|
||
<!-- Macro: \!\[.*\]\((.+)\)\<\!\-\- width=(.*) \-\-\>
|
||
Template: ac:image
|
||
Url: ${1}
|
||
Width: ${2} -->
|
||
<!-- Macro: \<\!\-\- :toc: \-\-\>
|
||
Template: ac:toc
|
||
Printable: 'false'
|
||
MinLevel: 2
|
||
MaxLevel: 4 -->
|
||
<!-- Include: 杂项/声明文件.md -->
|
||
|
||
<!-- :toc: -->
|
||
|
||
# Yearning 安装及 SSO 接入指南
|
||
|
||
## Yearning 安装启动
|
||
|
||
- 可以参考:https://next.yearning.io/zh/usage/ixah25xr/
|
||
|
||
### Docker Compose 启动
|
||
|
||
#### 修改 docker compose 文件
|
||
|
||
- Docker Compose 文件 `./docker-compose.yml`
|
||
|
||
```yaml
|
||
version: '3'
|
||
|
||
services:
|
||
yearning:
|
||
image: yeelabs/yearning:v3.1.5
|
||
environment:
|
||
MYSQL_USER: yearning
|
||
MYSQL_PASSWORD: ukC2ZkcG_ZTeb
|
||
MYSQL_ADDR: mysql
|
||
MYSQL_DB: yearning
|
||
SECRET_KEY: dbcjqheupqjsuwsm
|
||
IS_DOCKER: is_docker
|
||
ports:
|
||
- 8000:8000
|
||
volumes:
|
||
- ./opt/conf.toml:/opt/conf.toml
|
||
#- 首次使用请先初始化
|
||
#- command: /bin/bash -c "./Yearning install && ./Yearning run"
|
||
depends_on:
|
||
- mysql
|
||
restart: always
|
||
|
||
mysql:
|
||
image: mysql:5.7
|
||
environment:
|
||
MYSQL_ROOT_PASSWORD: ukC2ZkcG_ZTeb
|
||
MYSQL_DATABASE: yearning
|
||
MYSQL_USER: yearning
|
||
MYSQL_PASSWORD: ukC2ZkcG_ZTeb
|
||
command:
|
||
- --character-set-server=utf8mb4
|
||
- --collation-server=utf8mb4_general_ci
|
||
volumes:
|
||
- ./data/mysql:/var/lib/mysql
|
||
|
||
#- 默认账号:admin,默认密码:Yearning_admin
|
||
```
|
||
|
||
#### 修改配置文件
|
||
|
||
- 配置文件 `./opt/conf.toml`
|
||
|
||
```toml
|
||
[Mysql]
|
||
Db = "Yearning"
|
||
Host = "127.0.0.1"
|
||
Port = "3306"
|
||
Password = ""
|
||
User = "root"
|
||
|
||
[General]
|
||
SecretKey = "dbcjqheupqjsuwsm"
|
||
Hours = 4
|
||
Lang = "zh_CN"
|
||
|
||
[Oidc]
|
||
Enable = false
|
||
ClientId = "${keycloak的客户端ID}"
|
||
ClientSecret = "${keycloak的客户端Secret}"
|
||
Scope = "openid profile"
|
||
AuthUrl = "${issuer链接}/protocol/openid-connect/auth"
|
||
TokenUrl = "${issuer链接}/protocol/openid-connect/token"
|
||
UserUrl = "${issuer链接}/protocol/openid-connect/userinfo"
|
||
RedirectUrL = "${yearning的地址}/oidc/_token-login"
|
||
UserNameKey = "preferred_username"
|
||
RealNameKey = "name"
|
||
EmailKey = "email"
|
||
SessionKey = "session_state"
|
||
```
|
||
|
||
### Yearning OIDC 配置
|
||
|
||
- 可以参考:https://next.yearning.io/zh/usage/boccobus/
|
||
|
||
#### 修改配置文件(Keycloak示例)
|
||
|
||
- 配置文件 `./opt/conf.toml`
|
||
|
||
```toml
|
||
[Oidc]
|
||
Enable = true
|
||
ClientId = "${keycloak的客户端ID}"
|
||
ClientSecret = "${keycloak的客户端Secret}"
|
||
Scope = "openid profile"
|
||
AuthUrl = "${issuer链接}/protocol/openid-connect/auth"
|
||
TokenUrl = "${issuer链接}/protocol/openid-connect/token"
|
||
UserUrl = "${issuer链接}/protocol/openid-connect/userinfo"
|
||
RedirectUrL = "${yearning的地址}/oidc/_token-login"
|
||
UserNameKey = "preferred_username"
|
||
RealNameKey = "name"
|
||
EmailKey = "email"
|
||
SessionKey = "session_state"
|
||
```
|
||
|
||
- ${keycloak的客户端ID}:例如 `yearning`
|
||
- ${keycloak的客户端Secret}: Keycloak中获取
|
||
- ${issuer链接}: Keycloak 中获取
|
||
- ${yearning的地址}:yearning 请求地址
|
||
|
||
### 异常处理
|
||
|
||
- 如果出现异常,可以排查 `Yearning` 服务和 `Keycloak` 服务是否可以访问通畅。
|
||
- 或者说 `Yearning` SSO 配置中的链接在 `Yearning` 所在服务中是否可以正常访问
|
||
|
||
## 本地构建启动(参考)
|
||
|
||
- Yearning `3.1.9.1`
|
||
- 系统 `Ubuntu24.04`
|
||
- nodejs `v18.20.5`
|
||
- npm `10.8.2`
|
||
- go `go version go1.22.10 linux/amd64`
|
||
|
||
### 安装 GO
|
||
|
||
#### 下载安装
|
||
|
||
- 下载 go:https://go.dev/dl/
|
||
|
||
```shell
|
||
#- 解压
|
||
tar -zxf go1.22.10.linux-amd64.tar.gz
|
||
|
||
#- 移动
|
||
mv go /usr/local/go
|
||
|
||
#- 配置环境变量
|
||
vi /etc/profile
|
||
####- /etc/profile start
|
||
export GOROOT=/usr/local/go
|
||
export PATH=$PATH:$GOROOT/bin
|
||
####- /etc/profile end
|
||
|
||
#- 使配置生效
|
||
source /etc/profile
|
||
|
||
#- 查看是否成功
|
||
go version
|
||
```
|
||
|
||
#### 配置 go proxy
|
||
|
||
- 参考:https://goproxy.cn/
|
||
|
||
```shell
|
||
go env -w GO111MODULE=on
|
||
|
||
go env -w GOPROXY=https://goproxy.cn,direct
|
||
```
|
||
|
||
### 安装 Node
|
||
|
||
#### 下载安装
|
||
|
||
- 下载 nodejs:https://nodejs.org/en/download/
|
||
|
||
```shell
|
||
#- 解压
|
||
xz -d node-v18.20.5-linux-x64.tar.xz
|
||
tar tar -xf node-v18.20.5-linux-x64.tar
|
||
|
||
#- 移动
|
||
mv node-v18.20.5-linux-x64 /usr/local/nodejs
|
||
|
||
#- 配置环境变量
|
||
vi /etc/profile
|
||
####- /etc/profile start
|
||
export GOROOT=/usr/local/go
|
||
export NODE_HOME=/usr/local/nodejs
|
||
export PATH=$PATH:$GOROOT/bin:$NODE_HOME/bin
|
||
####- /etc/profile end
|
||
|
||
#- 验证安装
|
||
node -v
|
||
|
||
npm -v
|
||
```
|
||
|
||
### Yearning 源码安装
|
||
|
||
- 工作目录 `/usr/local/workspace`
|
||
|
||
#### 获取 Yearning
|
||
|
||
```shell
|
||
git clone https://github.com/cookieY/Yearning.git
|
||
```
|
||
|
||
#### 获取 Yearning 前端
|
||
|
||
```shell
|
||
git clone https://github.com/cookieY/gemini-next.git
|
||
```
|
||
|
||
#### 编译前端代码
|
||
|
||
```shell
|
||
#- 进入目录
|
||
cd /usr/local/workspace/gemini-next
|
||
#- 安装
|
||
npm install --registry https://registry.npmmirror.com
|
||
#- 构建
|
||
npm run build --registry https://registry.npmmirror.com
|
||
|
||
#- 将目标文件移动到源文件目录
|
||
mv dist /usr/local/workspace/Yearning/src/service/
|
||
```
|
||
|
||
#### 编译后端代码
|
||
|
||
```shell
|
||
cd /usr/local/workspace/Yearning
|
||
|
||
go mod tidy
|
||
|
||
cp conf.toml.template conf.toml
|
||
|
||
#- 修改 配置文件
|
||
vi conf.toml
|
||
|
||
#- 初始化(第一次需要)
|
||
#- go run main.go install
|
||
|
||
#- 启动
|
||
go run main.go run
|
||
```
|
||
|
||
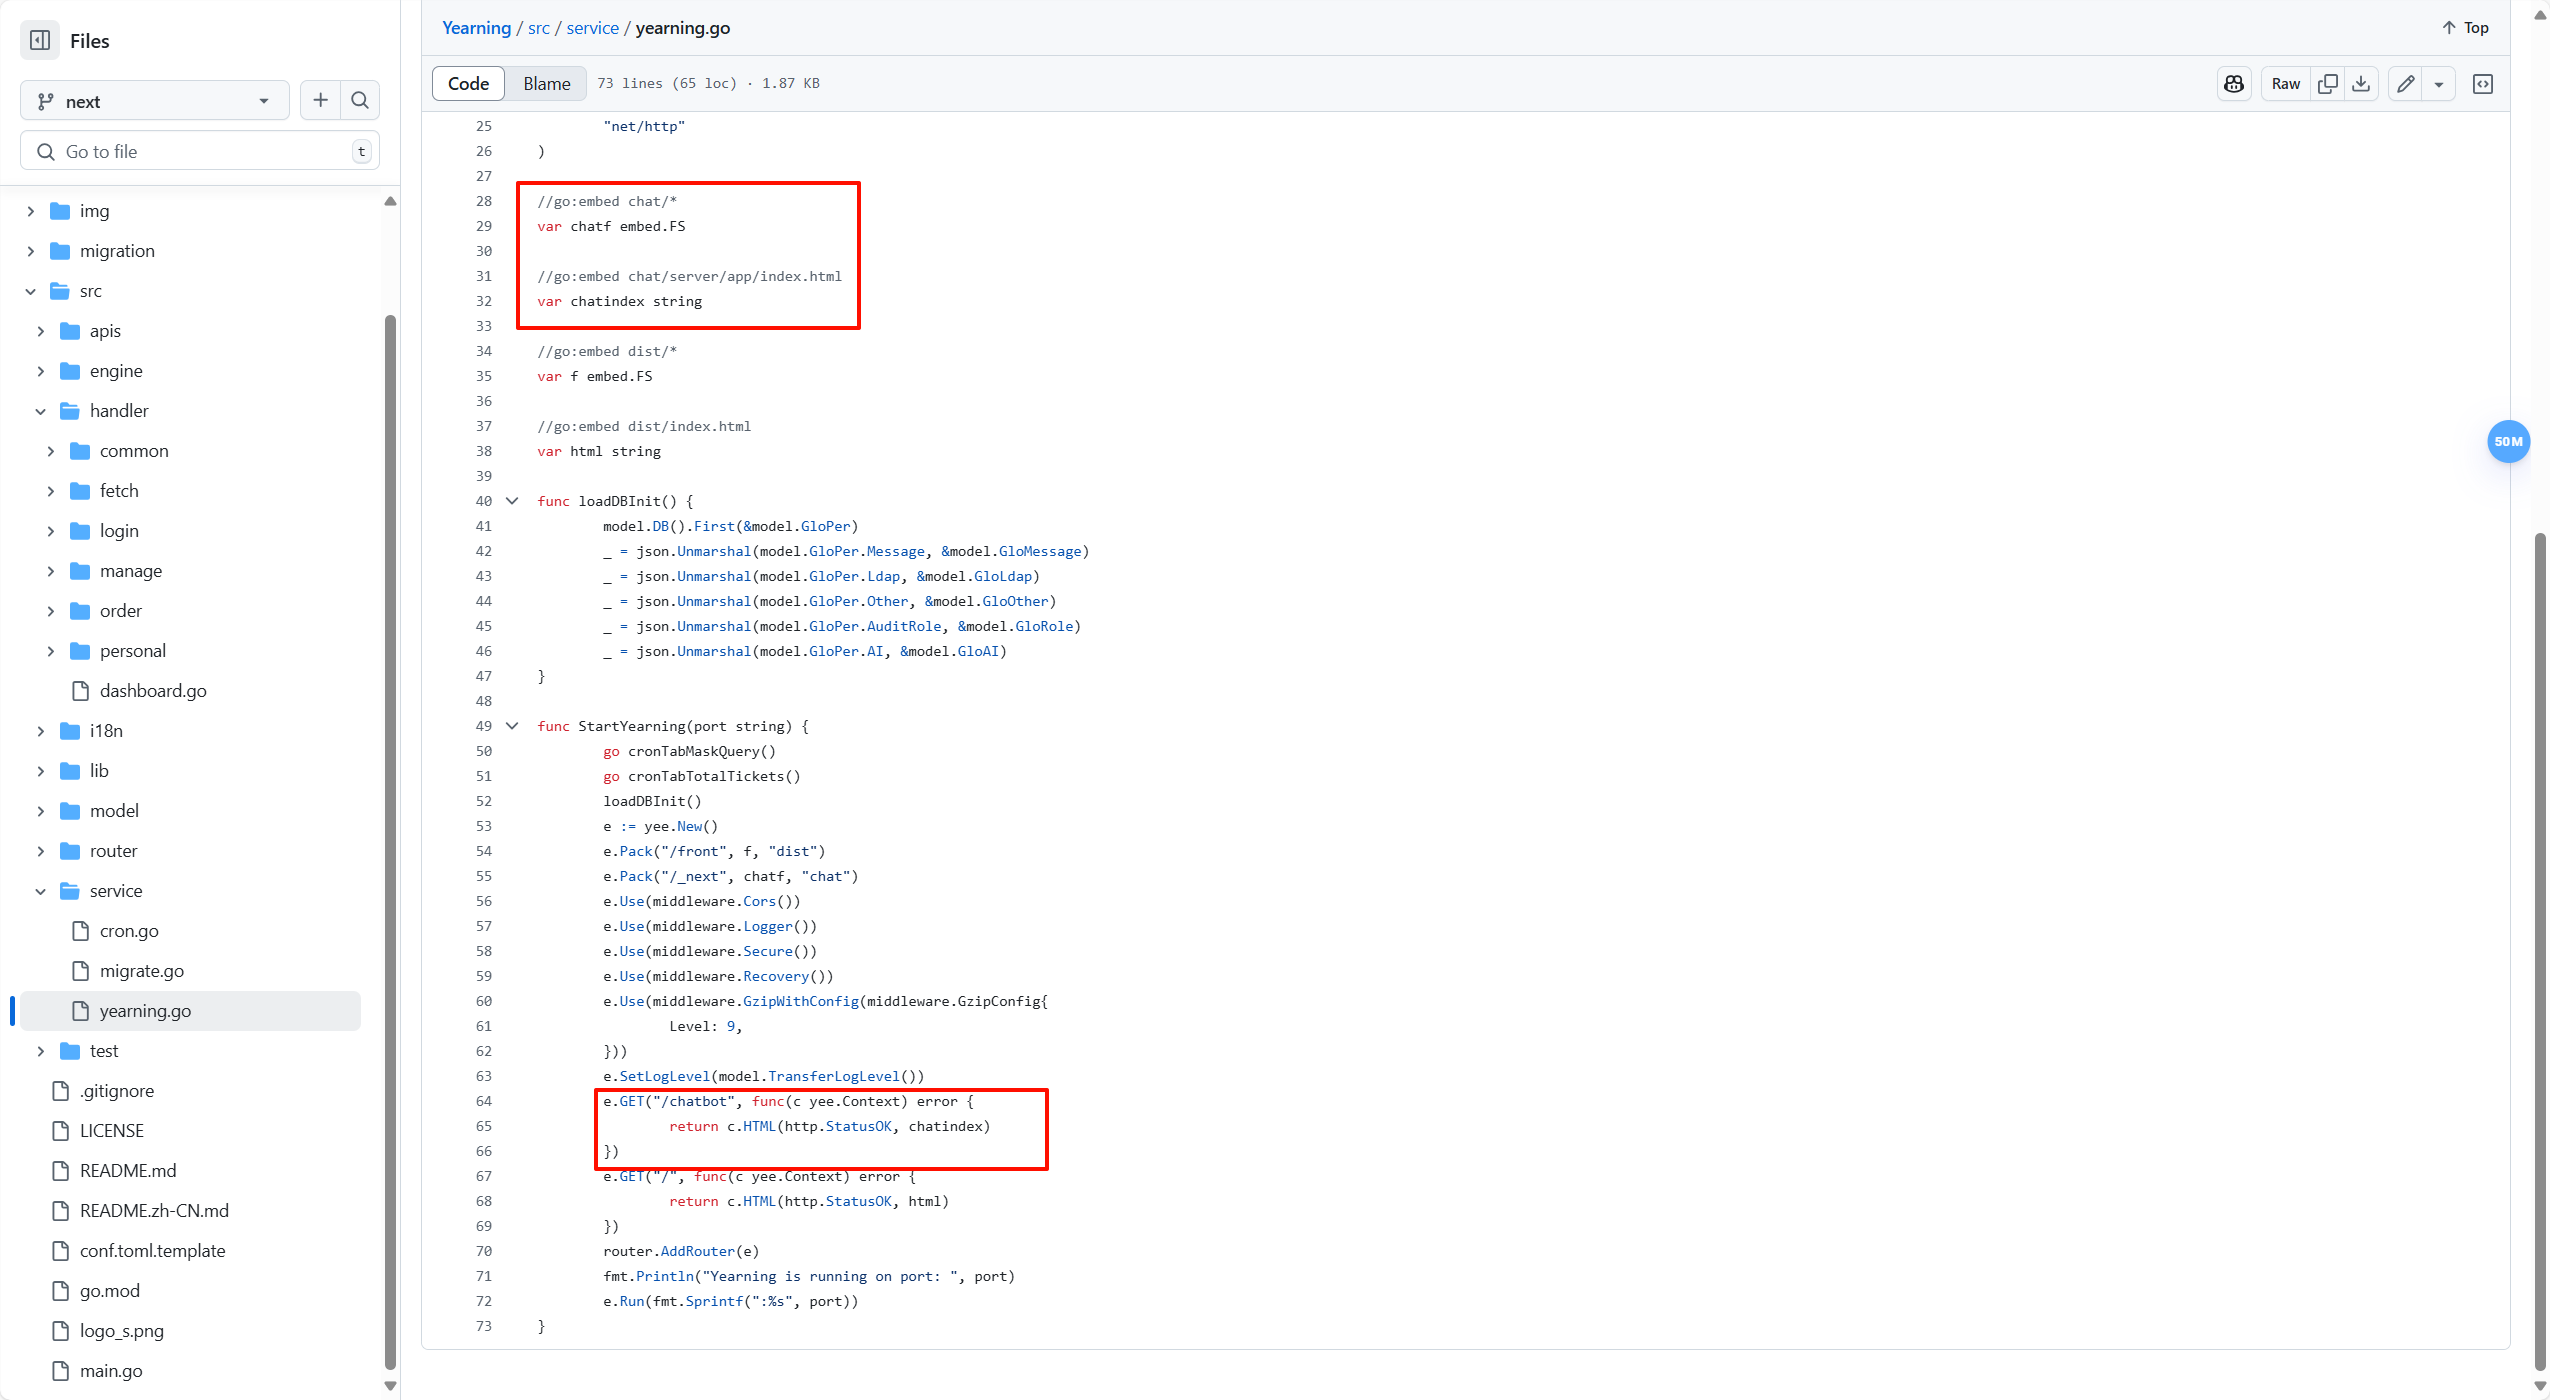
- 启动报错 `chat/* xxx`
|
||
- 编辑文件 `vi src/service/yearning.go`
|
||
- 删除报错提示的行相关的代码
|
||
- 
|
||
- 如图,删除上面的代码
|
||
|
||
## 参考
|
||
|
||
- [Yearning安装教程](https://next.yearning.io/zh/usage/ptbzchak/)
|
||
- [使用go语言编译部署最新版Yearning【v3.0.1】](https://blog.csdn.net/qq_44930876/article/details/125679454) |