All checks were successful
Publish to Confluence / confluence (push) Successful in 3m39s
141 lines
3.8 KiB
Markdown
141 lines
3.8 KiB
Markdown
<!-- Space: qifu -->
|
||
<!-- Parent: 后端技术&知识&规范 -->
|
||
<!-- Parent: 技术方案 -->
|
||
<!-- Parent: 基建 -->
|
||
<!-- Parent: 03-接入指南 -->
|
||
<!-- Title: 20250110-Confluence安装及SSO接入指南 -->
|
||
<!-- Attachment: ../材料/atlassian-agent.jar -->
|
||
|
||
<!-- Macro: :anchor\((.*)\):
|
||
Template: ac:anchor
|
||
Anchor: ${1} -->
|
||
<!-- Macro: \!\[.*\]\((.+)\)\<\!\-\- width=(.*) \-\-\>
|
||
Template: ac:image
|
||
Url: ${1}
|
||
Width: ${2} -->
|
||
<!-- Macro: \<\!\-\- :toc: \-\-\>
|
||
Template: ac:toc
|
||
Printable: 'false'
|
||
MinLevel: 2
|
||
MaxLevel: 4 -->
|
||
<!-- Include: 杂项/声明文件.md -->
|
||
|
||
<!-- :toc: -->
|
||
|
||
# Confluence 安装及 SSO 接入指南
|
||
|
||
## Confluence 安装启动
|
||
|
||
- 可以参考:https://www.iots.vip/post/atlassian-series-crack
|
||
|
||
### 获取 Agent
|
||
从合法渠道获取可用 Agent [`atlassian-agent.jar`](../材料/atlassian-agent.jar)
|
||
|
||
### 构建 Confluence 镜像
|
||
#### 创建 Dockerfile 文件
|
||
```dockerfile
|
||
FROM cptactionhank/atlassian-confluence:7.9.3
|
||
|
||
USER root
|
||
|
||
#- 将破解包加入容器
|
||
COPY "atlassian-agent.jar" /opt/atlassian/confluence/
|
||
|
||
#- 设置启动加载
|
||
RUN echo 'export CATALINA_OPTS="-javaagent:/opt/atlassian/confluence/atlassian-agent.jar ${CATALINA_OPTS}"' >> /opt/atlassian/confluence/bin/setenv.sh
|
||
```
|
||
#### 生成镜像
|
||
```shell
|
||
docker build -f Dockerfile -t confluence/confluence:7.9.3 .
|
||
```
|
||
|
||
|
||
### Docker Compose 启动
|
||
|
||
#### 创建 docker compose 文件
|
||
```yaml
|
||
version: '3.6'
|
||
services:
|
||
confluence:
|
||
env_file: .env
|
||
restart: always
|
||
image: confluence/confluence:7.9.3
|
||
ports:
|
||
- 10000:8090
|
||
volumes:
|
||
- ./data:/var/atlassian/confluence
|
||
```
|
||
#### 创建 .env 文件
|
||
```properties
|
||
CATALINA_OPTS=-Xms1024m -Xmx1024m -Datlassian.plugins.enable.wait=300
|
||
```
|
||
|
||
#### 启动 Confluence
|
||
```shell
|
||
docker compose up -d
|
||
```
|
||
|
||
#### 查看日志看是否破解成功
|
||
```shell
|
||
docker logs -f --tail 1000 `docker ps|grep confluence|awk '{print $1}'`
|
||
```
|
||
- 日志中出现 `============================== agent working ==============================` 表示 Agent 注入成功
|
||
|
||
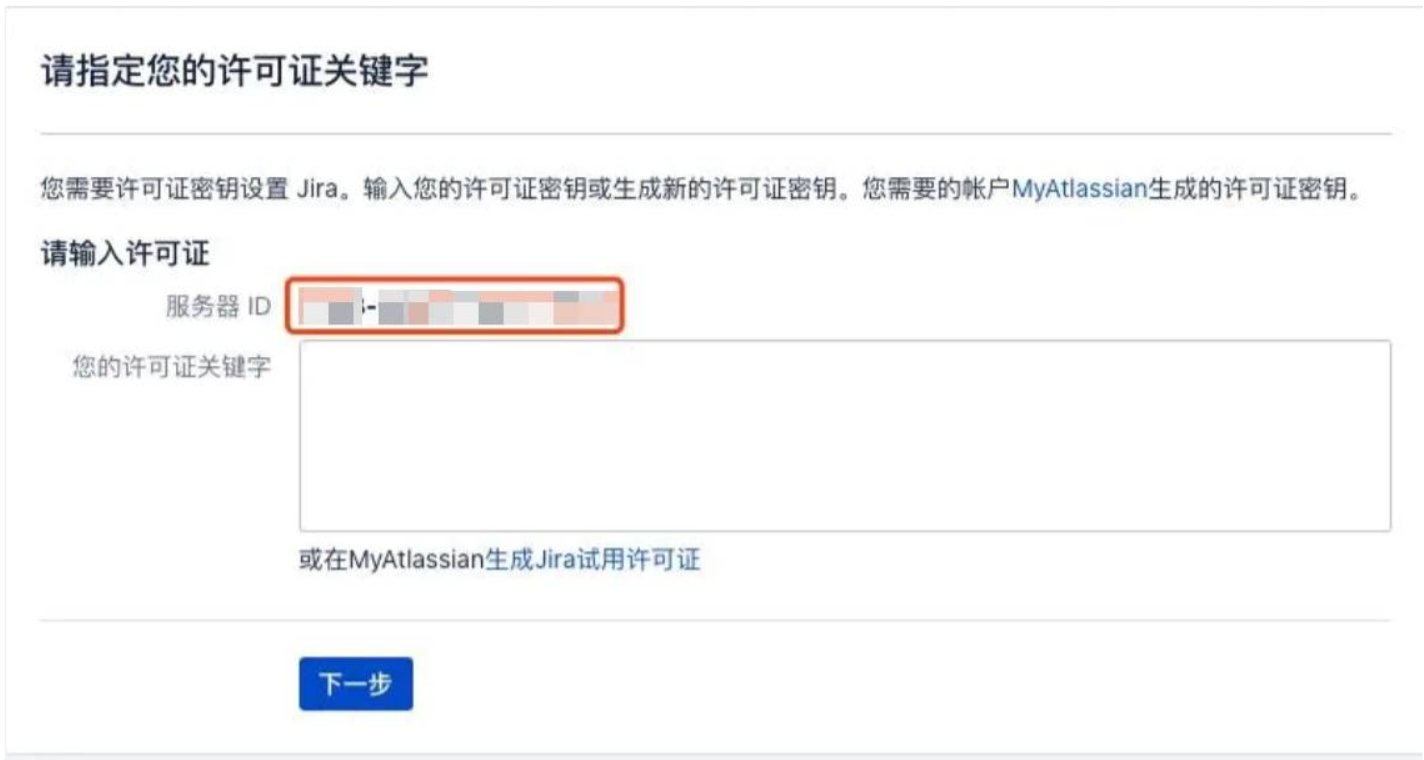
#### 浏览器打开 Confluence
|
||
- 跟着操作,直到下面界面
|
||
|
||
|
||
#### 生成 License
|
||
```shell
|
||
#- 进入容器
|
||
docker exec -it `docker ps|grep confluence|awk '{print $1}'` /bin/bash
|
||
|
||
#- 生成 license
|
||
java -jar atlassian-agent.jar -p conf -m test@test.com -n BAT -o https://www.iots.vip -s ${SERVER_ID}
|
||
```
|
||
|
||
### 插件安装
|
||
#### 安装插件
|
||
- 进入管理应用,查找新应用
|
||
- 搜索 `miniOrange OAuth`
|
||
- 点击 `免费试用` 进行应用安装
|
||
- 
|
||
|
||
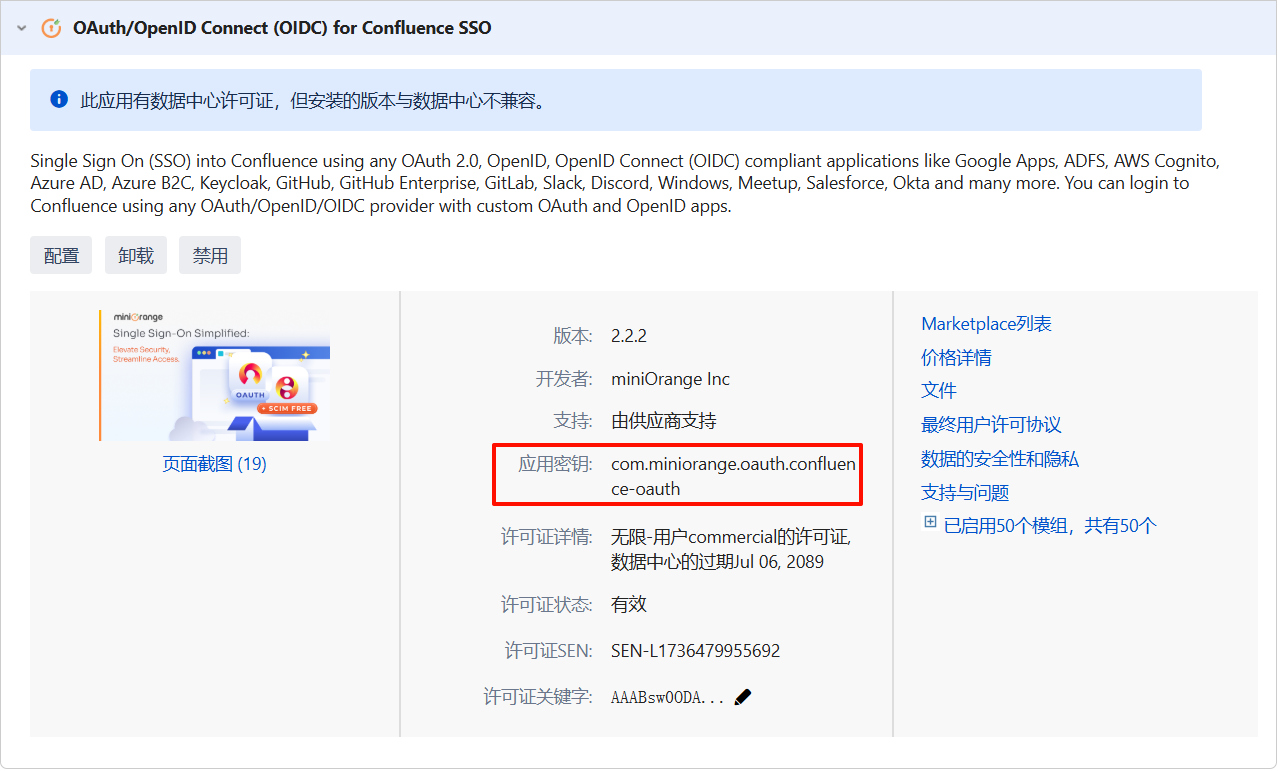
- 安装完后进入管理应用
|
||
- 点击刚刚安装的应用
|
||
- 复制 `应用密钥`
|
||
- 
|
||
|
||
#### 破解插件
|
||
```shell
|
||
#- 进入容器
|
||
docker exec -it `docker ps|grep confluence|awk '{print $1}'` /bin/bash
|
||
|
||
#- 生成 license
|
||
java -jar atlassian-agent.jar -d -p '${应用密钥}' -m test@test.com -n BAT -o https://www.iots.vip -s ${SERVER_ID}
|
||
```
|
||
- 将生成的 `license` 复制到输入框
|
||
|
||
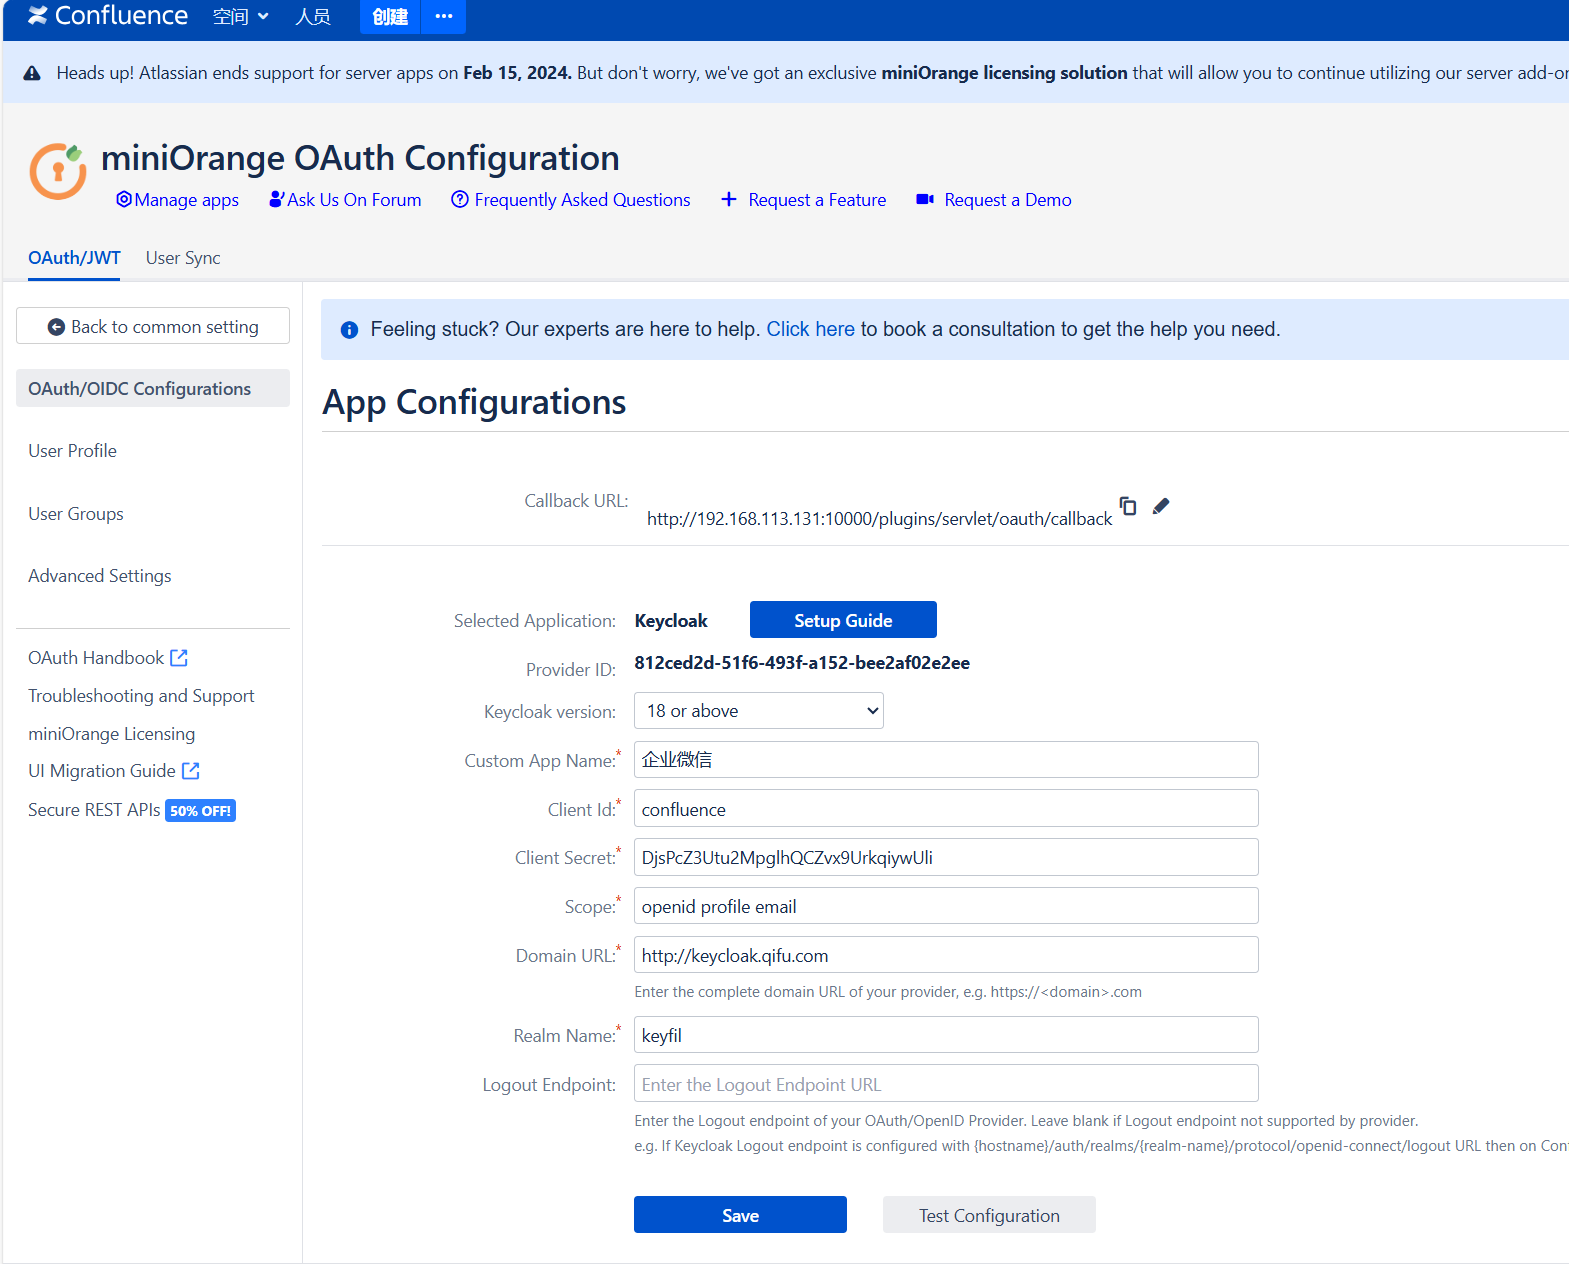
### SSO 插件配置使用
|
||
- OIDC 配置:
|
||
- 
|
||
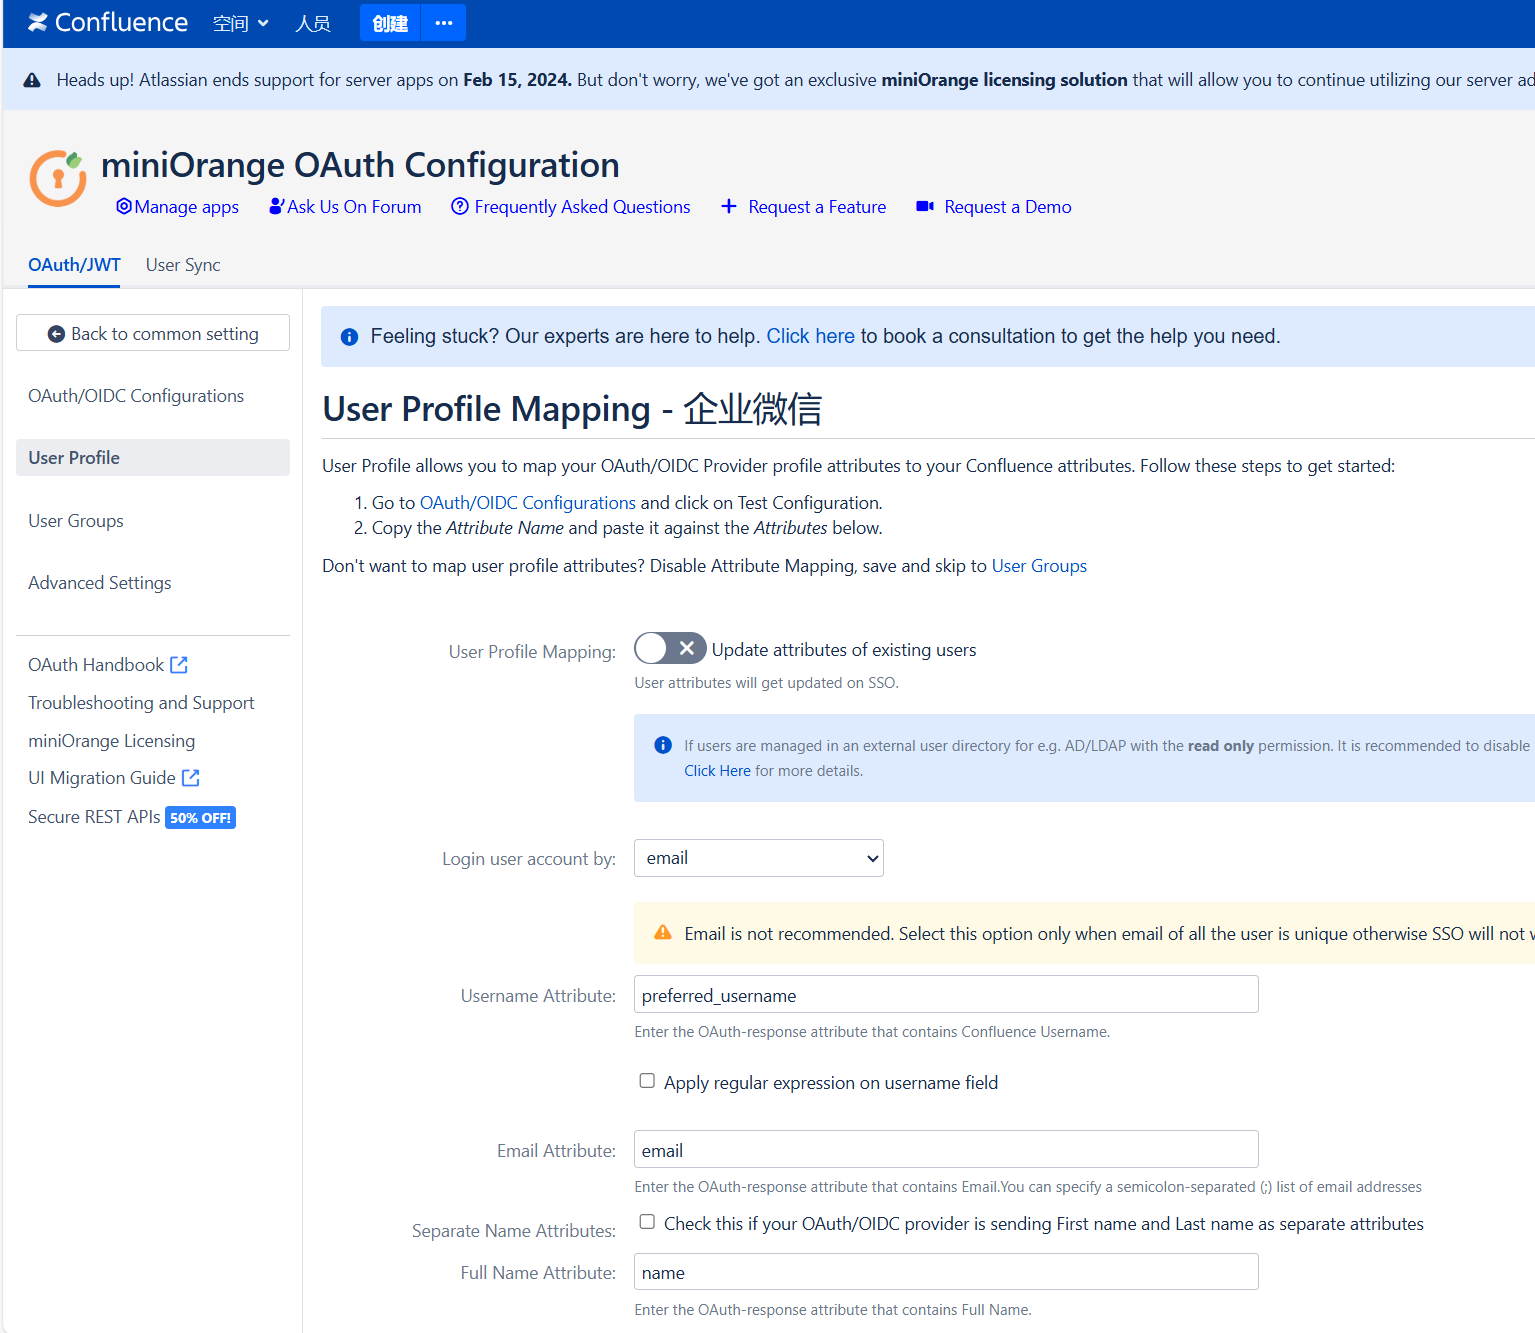
- 用户属性映射:
|
||
- 
|
||
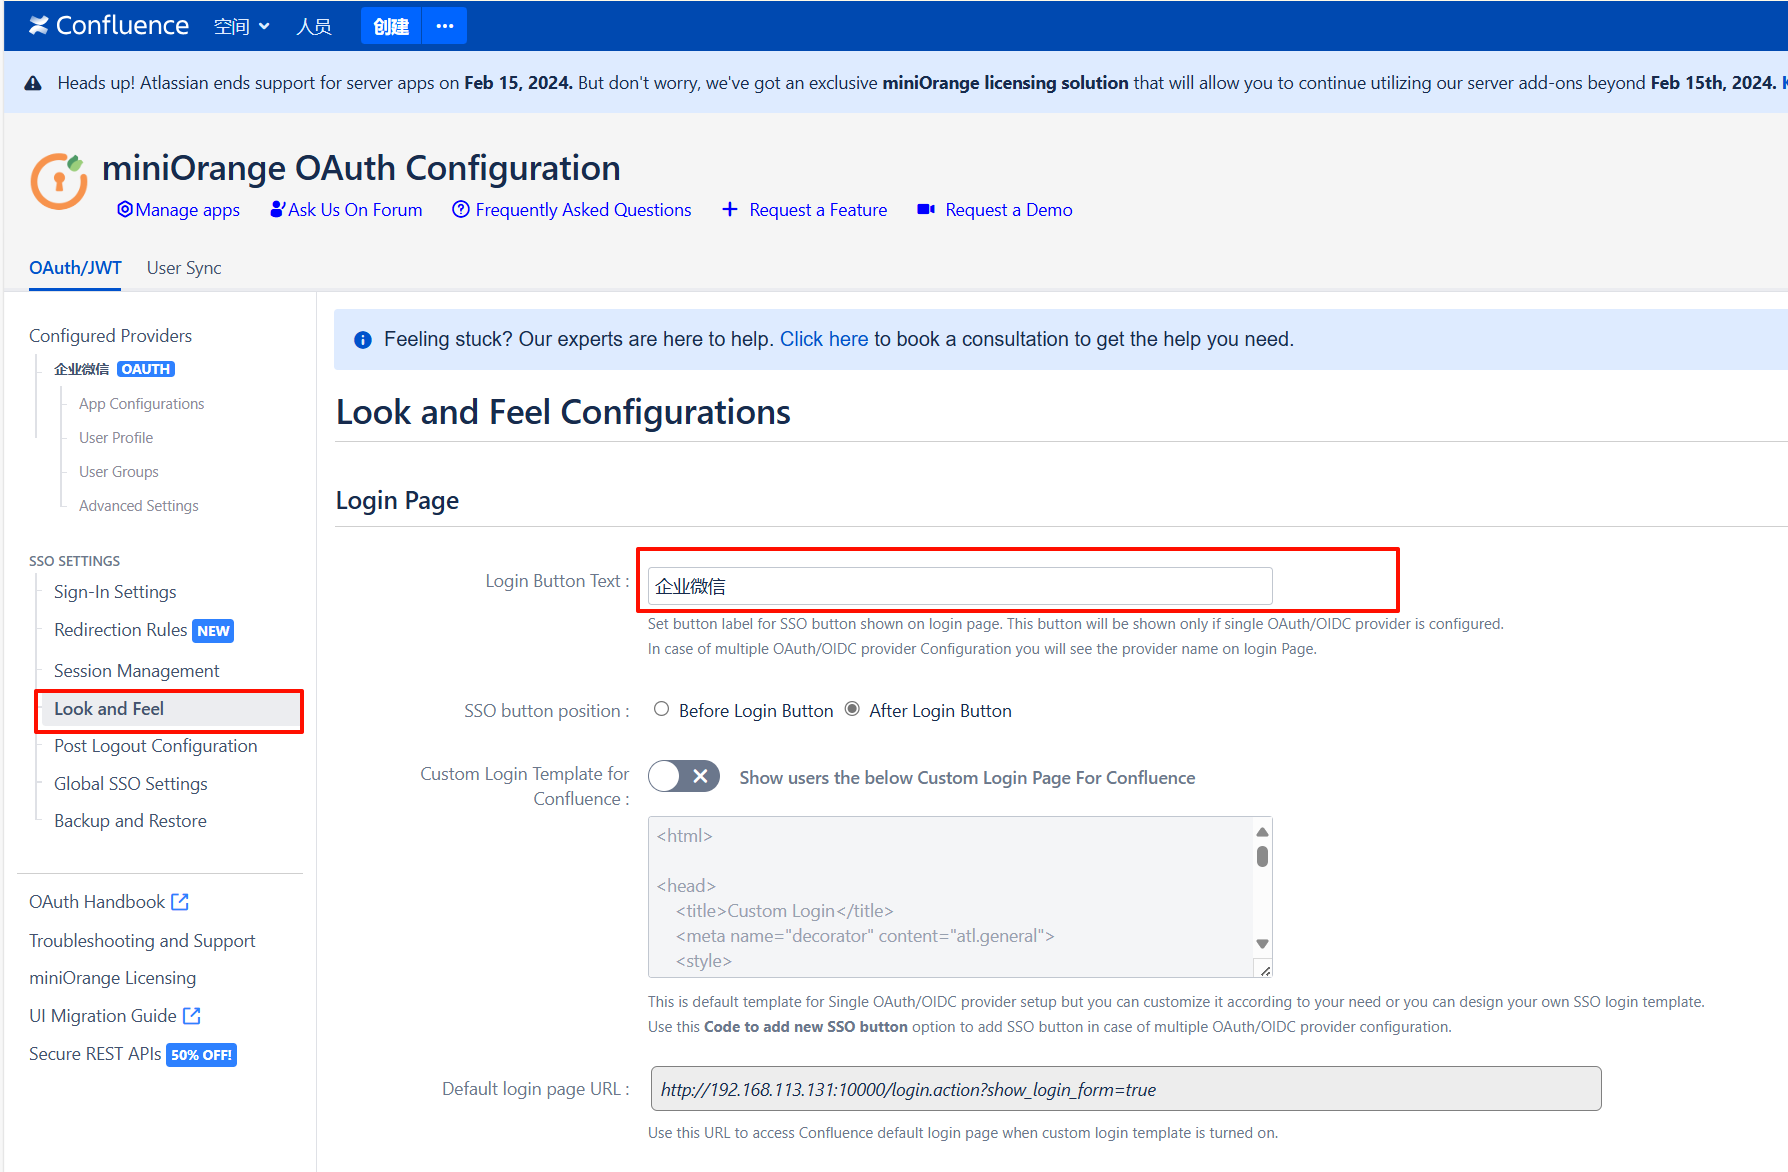
- 登录按钮配置:
|
||
- 
|
||
|
||
#### 配置用户组映射
|
||
- Keycloak 创建 Confluence 对应的群组
|
||
- 
|
||
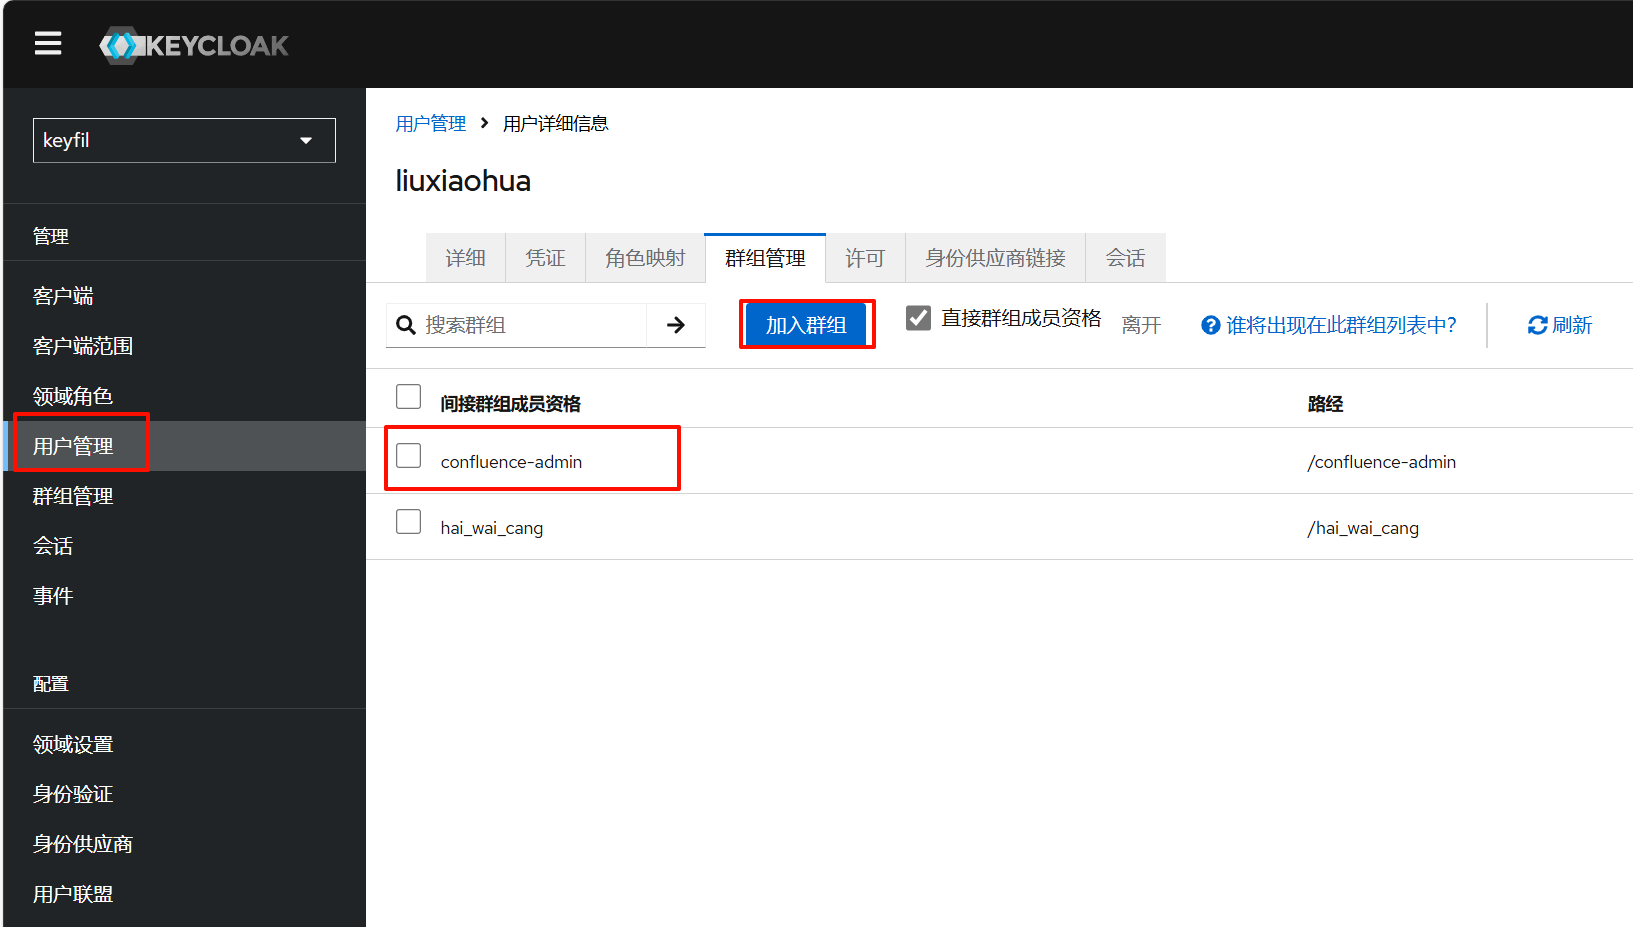
- Keycloak 用户加入对应的群组
|
||
- 
|
||
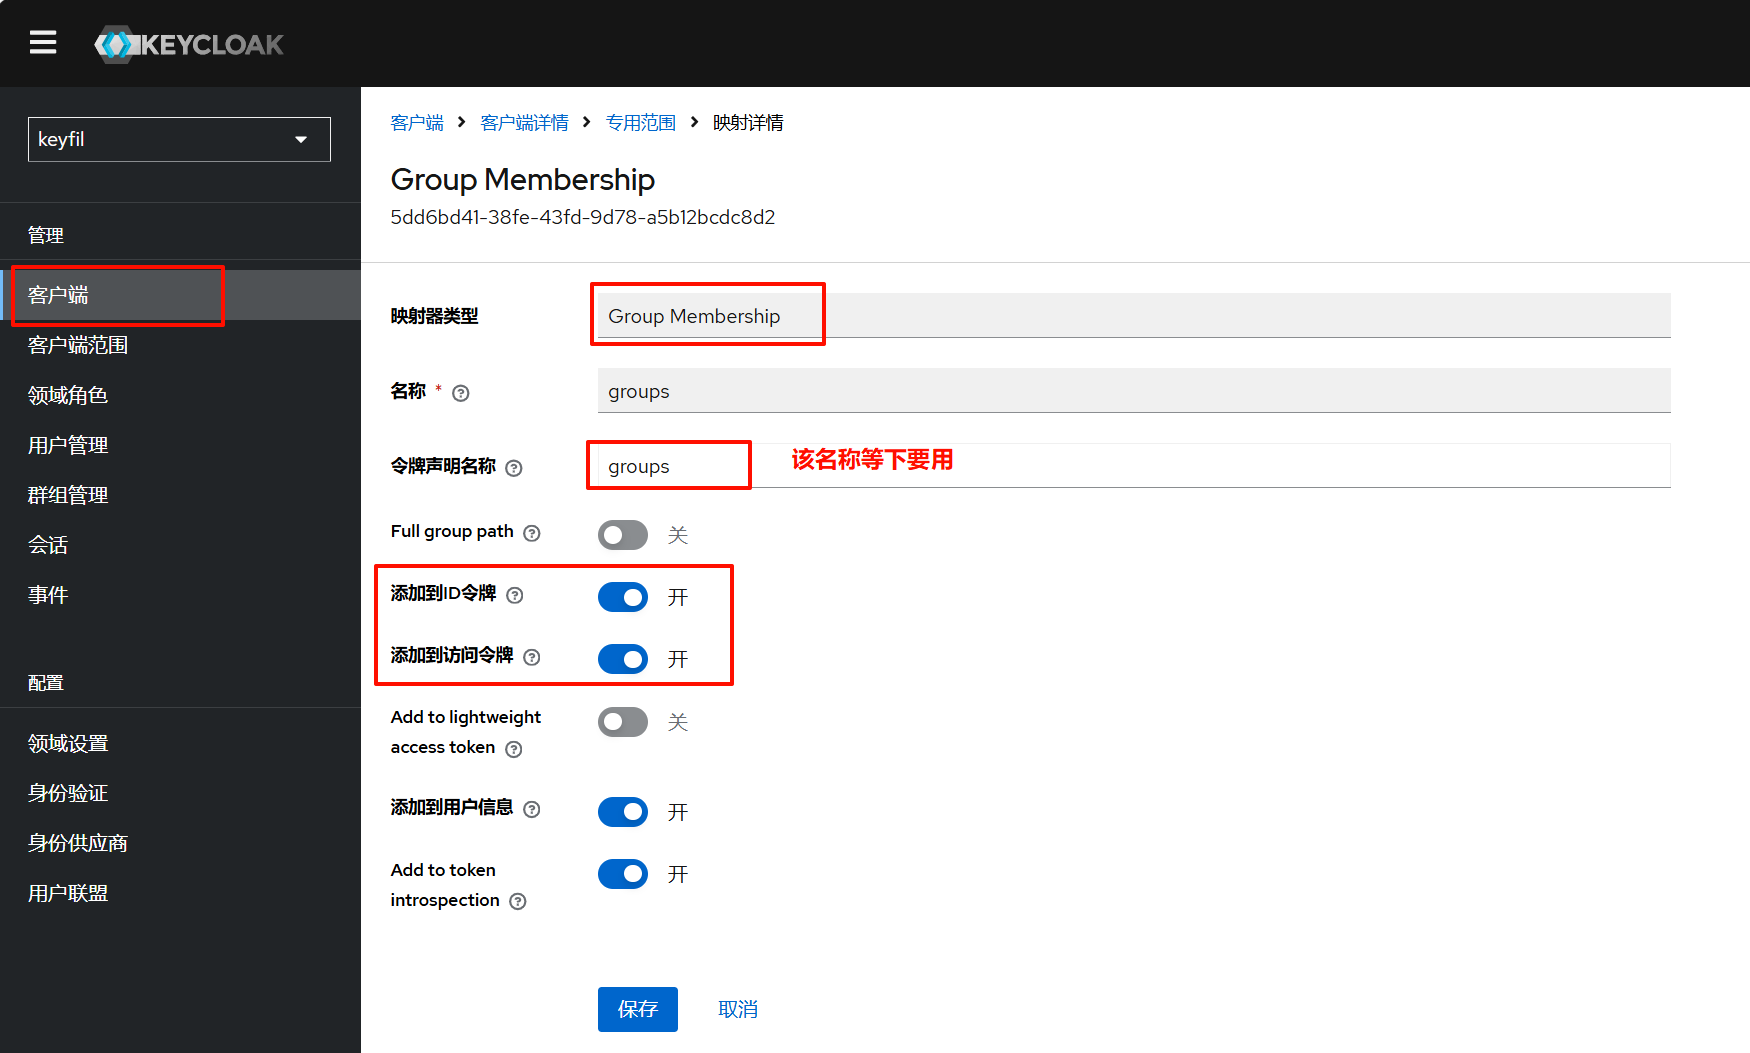
- Keycloak 客户端添加对应的映射 `客户端 / 客户端范围 / xxx-dedicated / 添加映射器 / 根据配置 / Group Membership`
|
||
- 
|
||
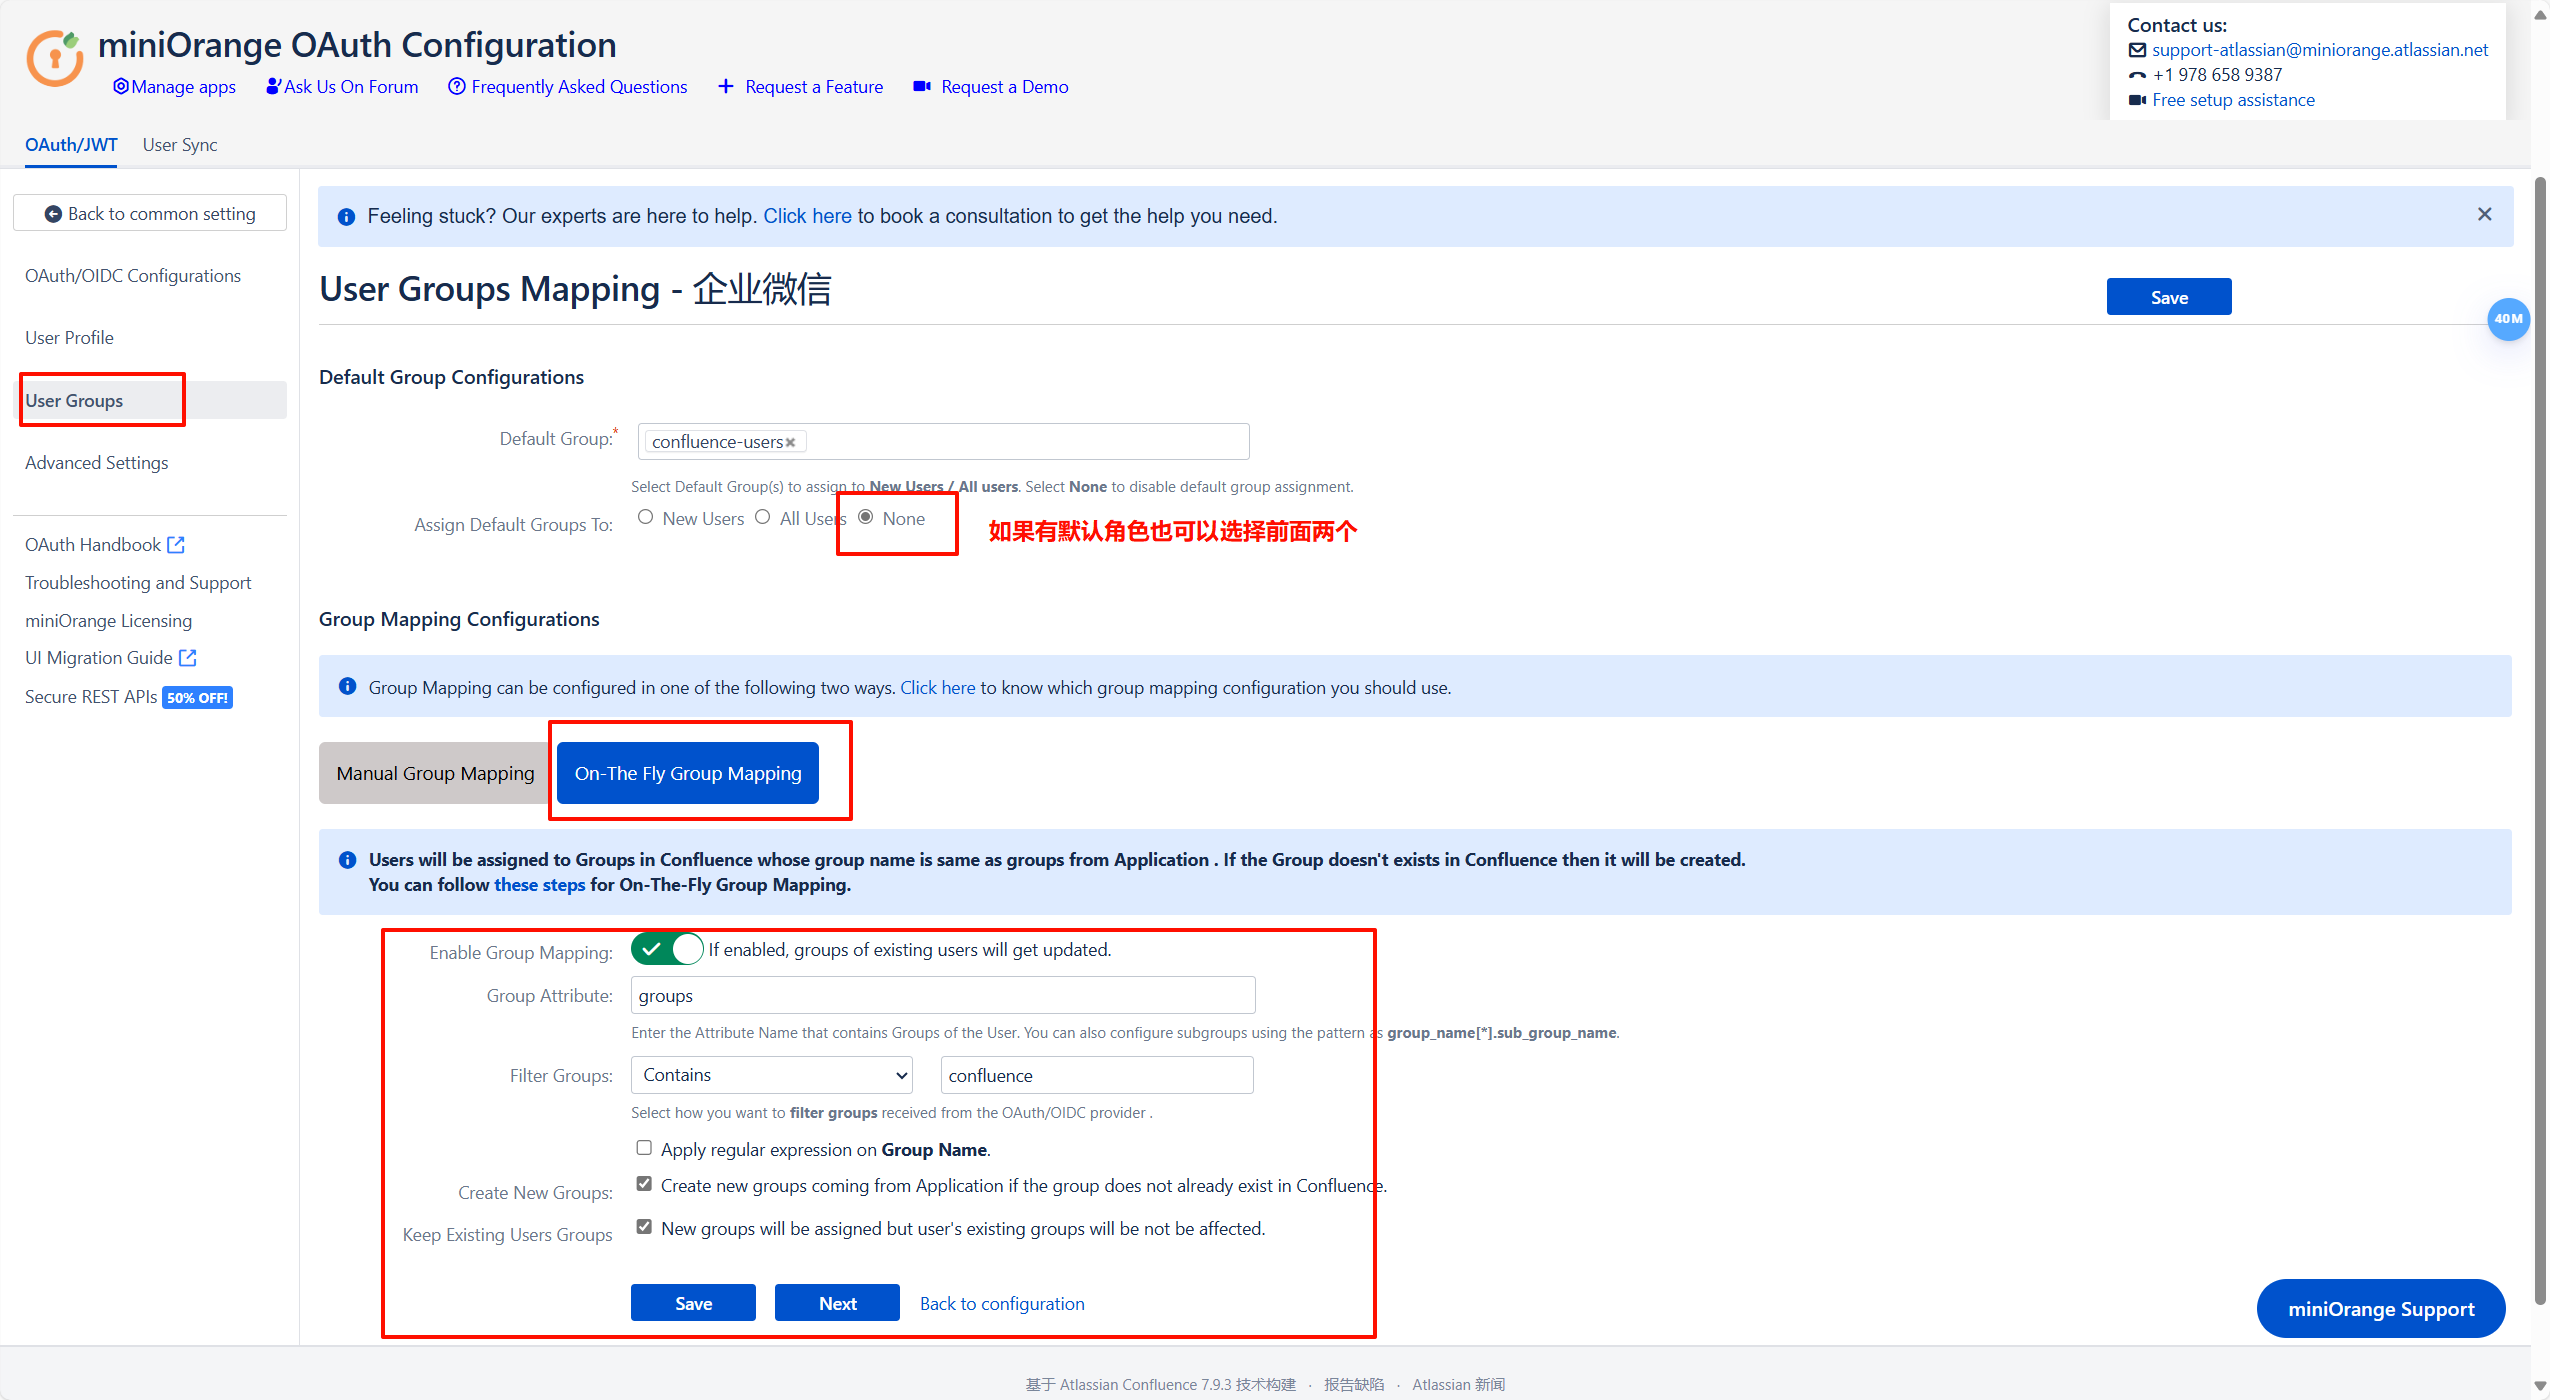
- Confluence 配置
|
||
- 
|
||
|
||
|
||
## 参考
|
||
|
||
- [Confluence](https://www.iots.vip/post/atlassian-series-crack)
|